tp
Developer Guide
- Acknowledgements
- Design
- Implementation
- Appendix: Requirements
- Appendix: Instructions for manual testing
Acknowledgements
Gson library
This project utilizes the Gson library for JSON deserialization. Gson is an open-source library developed by Google, providing simple methods to convert Java objects into JSON and back. It simplifies adding or retrieving data from a JSON data format, which is particularly useful in projects requiring extensive manipulation of JSON files.
License: Gson is released under the Apache License 2.0. This license allows for commercial and private use, modification, distribution, and distribution of modified versions of the library, making it an excellent choice for open-source projects.
More Information:
- For further details about Gson and its capabilities, visit the official Gson repository on GitHub: Gson GitHub.
NUS Mods API
This project utilizes data from NUSMods API for accessing National University of Singapore (NUS) modules information. This data is downloaded once and used statically within FAP.
The NUSMods API is an open-source initiative that provides academic data on modules available at NUS, which are publicly accessible and regularly updated. It simplifies the process of retrieving detailed module information & module credits, which are crucial for planning academic modules effectively in the FAP application.
Source:
- For more details about the API and the data it provides, visit the official NUSMods API documentation site: NUSMods API Documentation.
Acknowledgments:
- We are grateful to the NUSMods team for maintaining the API and making it freely available, which significantly enhances the functionality of academic applications like ours by providing reliable and up-to-date academic information.
Design
Architecture
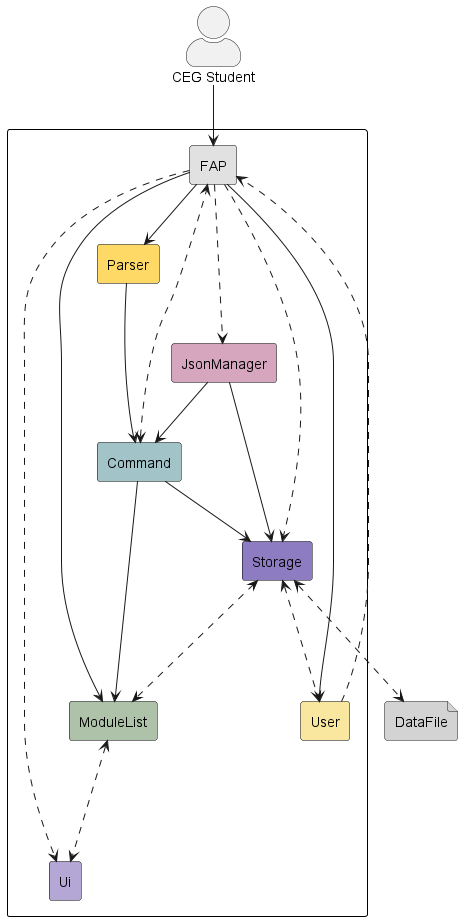
Below is an elaborate description of the UML diagram that outlines the structure and relationships of Architecture:
Classes Involved:
FAP: The central class that initializes and coordinates the various components of the application.ModuleList: Manages a collection of academic modules.Ui: Facilitates all user interactions through a command-line interface.Parser: Interprets user input into executable commands.Command: Implements the logic necessary for executing commands identified by theParser.User: Contains details about the user and their current semester.JsonManager: Handles operations related to reading from and writing to JSON files.Storage: Manages data storage and retrieval operations.
Flow and Interactions:
- The diagram centers on
FAP, highlighting its role as the orchestrator for the application’s operations. - It illustrates
FAP’s interactions with components likeUi,Parser,JsonManager, andStorage, emphasizing a structured and controlled flow of operations.
This narrative emphasizes the FAP class’s critical role in integrating the application’s functionalities, showcasing
its design focused on modularity, maintainability, and extensibility.
Running the Application Loop
The runApplication method encapsulates the application’s runtime loop, processing user commands until an
exit condition is met (either through an error or the ‘bye’ command). This method highlights the application of
polymorphism (via the Command class) and encapsulation, detailing interactions with other components.
private static void runApplication() {
    Ui ui = new Ui();
    boolean continueRunning = true;

    while (continueRunning) {
        try {
            String userInput = ui.getUserCommand();
            LOGGER.log(Level.INFO, "User input: " + userInput);
            Command command = Parser.getCommand(userInput);
            command.execute(userInput);
            user.resetModuleStatuses();
            saveModulesToFile(filePath);
            if (userInput.equalsIgnoreCase(BYE)) {
                continueRunning = false;
                ui.close();
            }
        } catch (Exception e) {
            LOGGER.log(Level.SEVERE, "An error occurred: " + e.getMessage(), e);
            System.err.println("An error occurred: " + e.getMessage());
            ui.close();
            continueRunning = false;  // Exit loop on error
        }
    }
}
Below is a Sequence diagram that describes the application loop:
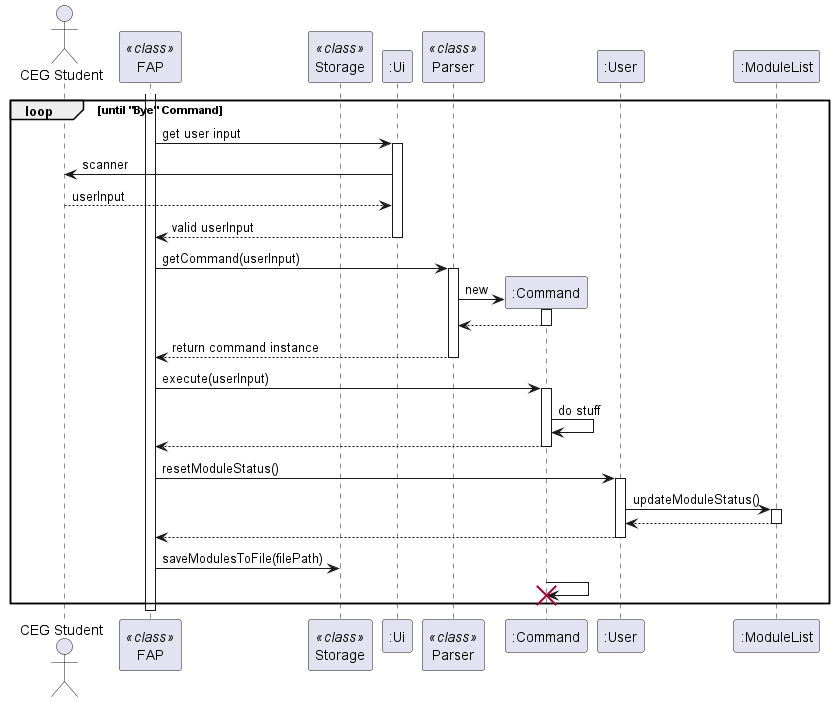
Key Points:
- Error Handling: Implements comprehensive error management that logs severe issues and terminates the application loop appropriately.
- Command Processing: It continuously processes commands through a loop that persists until ‘bye’ is entered or an
exception is thrown, using polymorphic
Commandobjects for executing a variety of actions. - Resource Management: Ensures all resources are appropriately closed upon exiting the loop, reflecting prudent
resource management practices (e.g., closing
Ui).
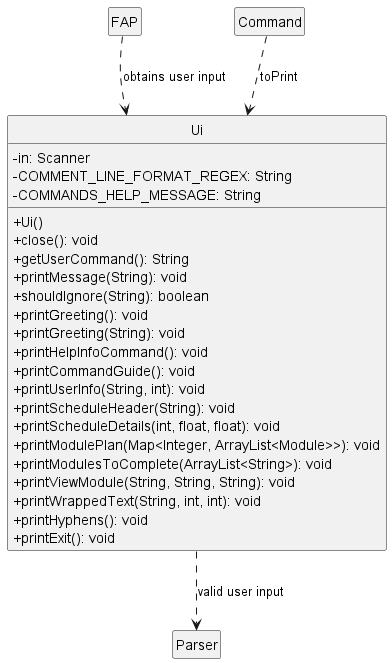
UI Class
Code: Ui.java
Overview:
The Ui class is responsible for handling all user interface interactions for the CEG (Computer Engineering)
Future Academic Planner application. It provides methods for displaying messages, obtaining user input, printing
schedules, module plans, and more.
The Ui class retrieves input from the user and passes it on to the Parser.
The Command class and its subclasses will call methods in Ui class for anything that needs to be printed.
User class
Code : User.java
The User class carries general information about the user of FAP.
As of v2.1, the user class is limited in functionality and only contain information about the user’s
namecurrent semesterof study
The User class is mainly utilized by SetCommand and ViewCommand through its getter and setter methods.
The main purpose of the User class is to introduce a basic level of personalization by allowing users to input and
store their personal information. This information will be shown to the users through Ui class
methods such as printUserInfo() and printGreeting().
Additionally, the User class helps to verify the status of the modules in the user’s plan, determining whether the
modules have been taken or not.
Parser package
Code:
The Parser class, together with the CommandMetadata class parses user input to
return appropriate command objects for the corresponding Command classes. If input validation fails or no
matching command is found, it returns an Invalid command instance.
Overview:
Below is a class diagram that shows the associations between Parser and CommandMetadata
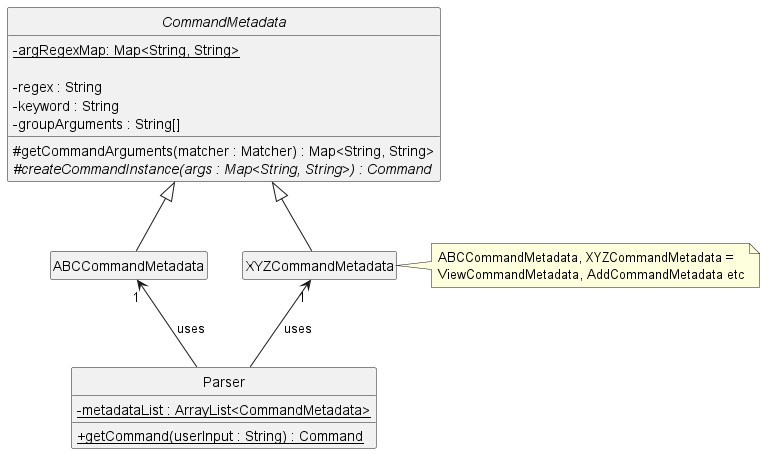
TheCommandMetadata class is an abstract class that manages regular expressions (regex) and validation
for command arguments, allowing subclasses to generate specific Command instances based on command keywords
and parsed arguments. For every Command class, there would be a corresponding CommandMetadata class (with the
exception of Invalid command) that overrides the method createCommandInstance to generate the Command instance of
the specific Command.
The Parser class maintains a list of these CommandMetadata subclasses instances and iterates through them to
identify a given user command.
Further implementation details are available at “Parsing User Inputs” section under Implementation.
How it works (Sequence):
Below is a sequence diagram that shows how the FAP main method calls Parser to parse a userInput
for a Command to return:
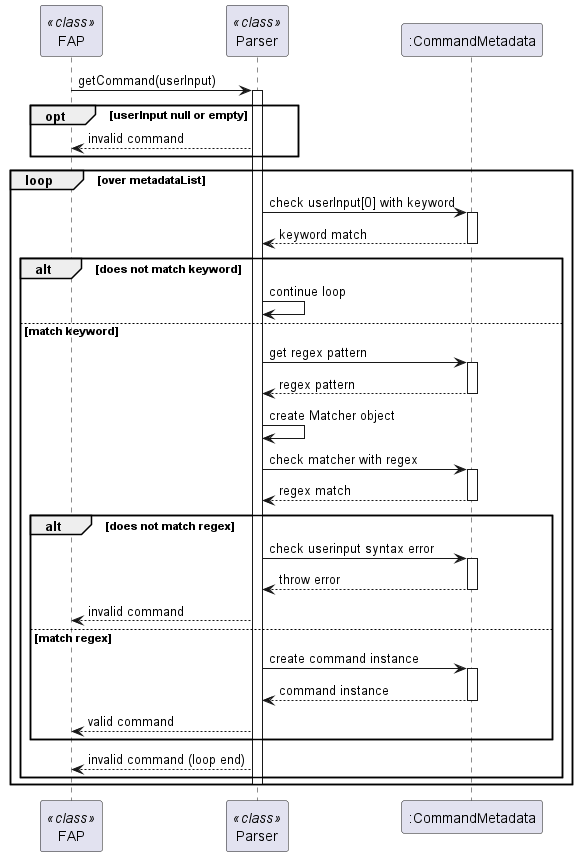
The method to parse and validate user inputs is handled in the Parser method getCommand(String userInput):
userInputis first checked to see if it is null or empty. If either condition is met,Parserreturns an ‘Invalid’ command instance.- The first
wordof theuserInputstring is then checked to see if it matches with a valid commandkeyword(Eg.add,remove,viewetc) - If there is no match, return an
Invalidcommand instance (on loop end) - If there is a match, the corresponding
CommandMetadataclass for thekeywordis called upon, and there will be a further attempt to match theuserInputstring with the commandregexexpression - If it does not match, the
CommandMetadataclass will validate the error in user string syntax, print out an error message, and return anInvalidcommand instance - If it matches, the command
argumentswill be extracted out and the respective command class instance will be created based on the overwritten methodcreateCommandInstancein the respectiveCommandMetadataclass
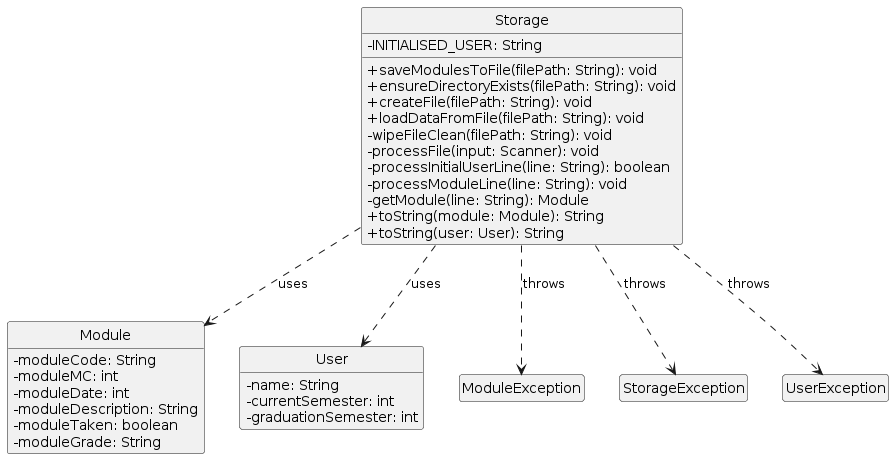
Storage
Code :
Storage.java
The Storage class in the Future Academic Planner (FAP) application is essential for handling the persistence
of user and module data. It allows the application to maintain state between sessions by reading from and writing
to files.
As of v2.1, the Storage class is capable of handling several critical functionalities:
- Saving Data: It serializes the
UserandModuleListobjects into a text format and writes this information to a specified file path. - Loading Data: It deserializes text data from a specified file path back into
UserandModuleListobjects.
Key Functionalities
- Saving User and Module Data
- Method:
saveModulesToFile(String filePath) - Description: This method saves serialized user information and a list of taken modules to a specified file.
It first checks and, if necessary, creates the directory path provided in the filePath. It then initializes a
BufferedWriterto write the data efficiently.
- Method:
- Loading User and Module Data
- Method:
loadDataFromFile(String filePath) - Description: This method loads user information and module data from the specified file. If the file does not exist, it creates a new one and returns early to avoid errors. It reads the file line by line, updating the user and module data within the application.
- Method:
- File and Directory Management
- Methods:
createFile(String filePath),ensureDirectoryExists(String filePath) - Description: These methods manage the file system interactions necessary for reading from and writing to files, such as verifying directory existence and creating files as needed to prevent errors during the data load and save processes.
- Methods:
Usage in Commands
- SetCommand and ViewCommand: These commands utilize the
Storageclass to persist changes to the user and modules immediately after modifications, ensuring data integrity and continuity. - Startup and Shutdown: On startup,
loadDataFromFileis invoked to initialize the application state, and on shutdown,saveModulesToFileis called to save the current state.
Purpose
The main purpose of the Storage class is to abstract the complexities of file management and data serialization away
from the core application logic. This simplification allows other parts of the application, such as commands and
controllers, to interact with user and module data more efficiently and reliably.
Additionally, by handling data persistence, the Storage class ensures that user progress and configurations are not
lost between application sessions, thereby enhancing user experience and application reliability.
Interaction with Other Classes
- Interacts With:
User: To save and load user-specific data like name and current semester.ModuleList: To save and load the list of modules the user has taken.FileWriter/BufferedWriter: Used withinsaveModulesToFileto write data to files.Scanner/FileReader: Used withinloadDataFromFileto read data from files.
Module Class and Module List Class
Code:
The Module class and ModuleList class work together to store the data of the modules added by the user
The Module class is responsible for containing the main attributes of a module such as moduleCode, moduleGrade, moduleMC, moduleTaken, moduleDate, gradedGradingBasis, and moduleDescription. These are relevant attributes that other classes use for certain actions done by the user.
The ModuleList class is responsible for managing the attributes contained in the Module class. They are mainly actions that value add to these attributes. For example, calculating the total amount of MC (module credit) the user has, calculating the GPA the user has, changing the grade of a certain mod, or adding a new module.
Hence, these are not just simple getters and setters, instead actions that value add to the attributes of the Module class, letting the user use them for different purposes in real life.
This design allows a separation of concern which separates the purpose of each of these two classes and ultimately leads to higher cohesion and lower coupling.
Below is the class diagram of how the module and modulelist class interacts with other relevant classes
Command
Here’s how the Command class interact with the other classes:
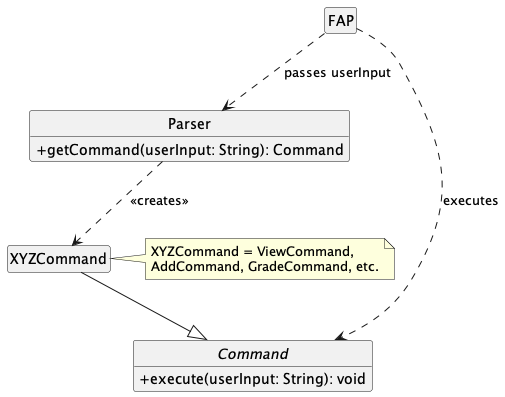
How the Command component works (together with other classes):
- When the user’s input is received in
FAP.java, it is passed into theParserclass which then creates an instance of theCommandobject. - The object would be a specific implementation of the
Commandclass (i.e.AddCommand,ViewCommand, etc.) - The specific
Commandsubclass would then be present inFAP.javaas a newCommandobject execute()is then called on the object to perform its task.
Implementation
This section describes some noteworthy details on how certain features are implemented.
Parsing User Inputs
Use of regular expressions (Regex) in FAP:
The add command class requires a user input that best matches this string
add c/COURSECODE w/SEMESTERTAKEN
where COURSECODE and SEMESTERTAKEN have their defined restrictions: COURSECODE should best match an actual
course code at NUS, SEMESTERTAKEN should be a number value in some range. The COURSECODE and SEMESTERTAKEN
will thus have their own argument regex pattern.
A simple regex example would be that SEMESTERTAKEN would be a number ranging from 1-8 to represent a normal honours
pathway for a CEG student (FAP’s target user). A regex pattern for that could look like w/(?<semester>[1-8]) (In this
case, w/ is used as a delimitter but it is not strictly neccessary unless the regex have special
conditions such as allowing whitespaces). An argument name capturing group semester is enclosed within the
brackets so that the argument group will be named and thus the argument value (anywhere between 1-8) can be
referenced/called and retrieved by using the Matcher method group() with the argument "semester".
Meanwhile, the java utility classes Pattern and Matcher would handle the checks that the argument value given
is indeed between 1-8.
A userInput regex for FAP would thus follow this convention:
keyword argument_1 argument_2 ...
This full regex pattern for a command itself can be generated by having a keyword, as well as all the
argument group names (a name to use so as to reference the argument) and the argument regex pattern
corresponding to that name reference. Typically, these arguments should be spaced out and thus a \s+ (representing
at least one whitespace character) is placed between the gaps of the regex pattern for
keyword, argument_1, argument_2...
While regex allows the userInput checks to be prudent, as well as potentially offering the flexibility for string
inputs to allow a different order of arguments, there are limitations where it becomes hard to determine the exact
error of the user’s input solely based on the regular expressions, because it solely returns a true/false value
if the string value itself fits the regex criteria given. Regardless, we think the use of regex in FAP can help provide
us safety in the arguments that passes through to the commands via the userInput.
Developer usage FAP: Parser & CommandMetadata class as of v2.1: How to create a new command
- First, we need a
Commandtype class to return as an object. In the future, this may be expanded to anyTtype. - Second, we need a string that would be used to create this
Commandinstance. This string should follow the formatkeyword argument_1 argument_2...where thekeywordis mandatory,argument_1, argument_2...are optional. - Third, for every argument available, make a regex pattern with name capturing that encloses the value within the
brackets. (e.g.,
n/(?<name>[A-Za-z0-9 ]+),g/(?<grade>[ab][+-]?|[cd][+]?|f|cs))
Using example add c/COURSECODE w/SEMESTERTAKEN
- Create a subclass that extends
CommandMetadata. - Put in the
keyword(e.g.,add) andgroupArgumentNames(e.g.,{"courseCode", "semester"}) in the superclass constructor. - Define the argument regex pattern in the static variable
argsRegexMapwith the correspondinggroupArgumentNameand argumentregexpattern.- Note: Currently
argsRegexMapis in the superclassCommandMetadata(e.g.,argRegexMap.put("semester", "w/(?<semester>[1-8])")).
- Note: Currently
- Override the method
createCommandInstance(Map<String, String> args)to implement the method on how to create theCommandobject you want. Return theCommandinstance.- Note:
Map<String, String> argscontains thegroupArgumentName : argumentValuepairing.
- Note:
- In the
Parserclass, add the createdCommandMetadatasubclass tometadataList. - The
ParsermethodgetCommand(String userInput)will help validate theuserInput. If theuserInputmatches the string you wanted, thengetCommand(String userInput)will return the Command instance you require.
Sample CommandMetadata example code:
public class AddCommandMetadata extends CommandMetadata {
private static final String ADD_KEYWORD = "add";
private static final String[] ADD_ARGUMENTS = {"courseCode", "semester"};

public AddCommandMetadata() {
    super(ADD_KEYWORD, ADD_ARGUMENTS);
}

// Add Command Creator
@Override
protected Command createCommandInstance(Map<String, String> args) {
    String moduleCode = args.getOrDefault("courseCode", "COURSECODE_ERROR");
    String semester = args.getOrDefault("semester", "SEMESTER_ERROR");
    int semesterInt = Integer.parseInt(semester);

    return new AddCommand(moduleCode, semesterInt);
}
v2.1: Optional regex arguments is now supported (eg. userInput regex expressions view and view c/COURSECODE
can now be both valid). This feature is still under testing.
Here is an extended developer usage guide:
- For every argument that can be optional, a new
String[]has been introduced. ThisString[]should match the length of the regularString[]containing the argument names. Each element in this new array should indicate whether the corresponding argument is optional or mandatory. For instance, ifcourseCodeis mandatory, andsemesteris optional:
private static final String[] ADD_ARGUMENTS = {"courseCode", "semester"};
private static final String[] ADD_ARG_FLAGS = {"mandatory", "optional"};
- Put the new
String[]inside the superclass constructor, an example is as follows:
public AddCommandMetadata() {
    super(ADD_KEYWORD, ADD_ARGUMENTS, ADD_ARG_FLAGS);
}
- Otherwise, if all argument
regexis mandatory, there is no need to include it in the superclass constructor:
public AddCommandMetadata() {
    super(ADD_KEYWORD, ADD_ARGUMENTS);
}
Saving modules to file
The Storage class is responsible for managing the persistence of user and module data to and from files.
This document section focuses on the saveModulesToFile method, which saves the current user’s information and their
module list to a specified file path.
Method: saveModulesToFile
public static void saveModulesToFile(String filePath) throws StorageException {
    try (BufferedWriter writer = new BufferedWriter(new FileWriter(filePath))) {
        writer.write(toString(user) + System.lineSeparator());
        for (Module module : moduleList.getTakenModuleList()) {
            writer.write(toString(module) + System.lineSeparator());
        }
    } catch (IOException | SecurityException e) {
        throw new StorageException("An error occurred while saving modules to file: " + filePath);
    }
}
Parameters:
filePath- The path of the file where the data is to be saved.
Throws:
StorageException- if an error occurs during the file writing process.
Process Description:
- File Writing Setup:
- Initializes a
BufferedWriterwrapped around aFileWriterto write text to the file efficiently. This setup benefits from buffered writing, which minimizes the number of physical disk writes.
- Initializes a
- Writing User Data:
- The user’s data is converted to a string format and written to the file first, followed by a newline character to separate entries clearly.
- Writing Modules Data:
- Iterates over the list of taken modules (
moduleList.getTakenModuleList()), converting each module to a string format and writing it to the file. Each module entry is written on a new line.
- Iterates over the list of taken modules (
- Resource Management:
- The
BufferedWriteris declared within a try-with-resources statement, ensuring that it is closed at the end of the statement block, regardless of whether the operation completes successfully or fails.
- The
Error Handling:
- Catches
IOExceptionandSecurityException, throwing aStorageExceptionwith a message detailing the failure. This encapsulation of exceptions provides a clear API for the method, simplifying error handling for the caller.
UML Sequence Diagram Explanation
Below is the UML sequence diagram for the saveModulesToFile method, illustrating the interactions
between components during the file-saving process.
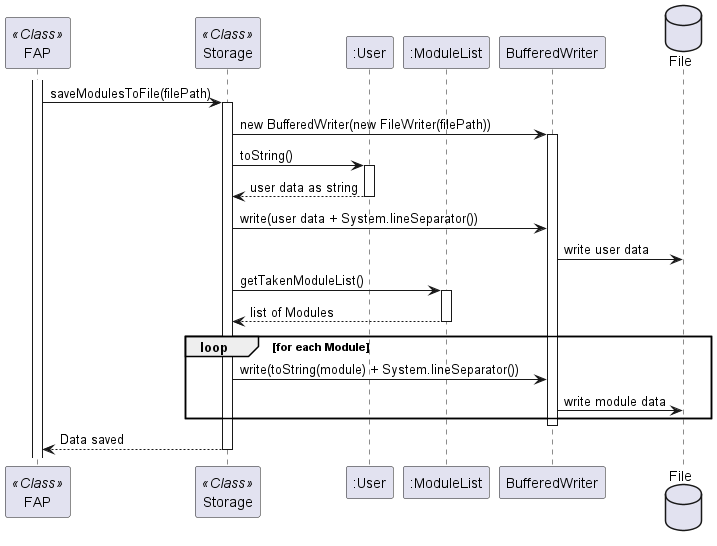
Steps Illustrated in the Diagram:
- Main Initiates Save:
- The
FAPclass (or the main method) callssaveModulesToFile, passing the file path where data needs to be saved.
- The
- Storage Operations:
- Directory Check: Verifies or creates the necessary directory.
- File Writer Setup: Sets up the
BufferedWriterandFileWriter. - Data Writing:
- Writes user data.
- Iteratively writes data for each module in the
ModuleList.
- Completion:
- Once all data is written, the
BufferedWriteris closed (implicitly by the try-with-resources), which also flushes the buffer to the file, finalizing the write operation.
- Once all data is written, the
View Commands
User input is passed to Parser.getCommand(), which determines that the input contains the keyword view, which
branches out depending on whether it is followed by a c/COURSE_CODE (refer to the Parser implementation
on how it detects optional inputs).
-
View Schedule (without
c/COURSE_CODE)
- Calls
ModuleList.getModuleMySemester(). - Subsequently, calls
Ui.java’sprintScheduleHeader(),printModulePlan(), andprintScheduleDetails().
-
View Specific Course Information (with
c/COURSE_CODE)
- Checks if the course exists in NUS AY23/24 by calling
JsonManager.moduleExist(). - In the event the method returns
false, else it callsJsonManager.queryModuleInfo()to get the module’s relevant details (i.e. course title, MCs and description). - It prints out a statement stating the module does not exist if point 1. returns false, else it prints out the module information.
The following diagram illustrates how the ViewCommand operates when execute() is called:

-
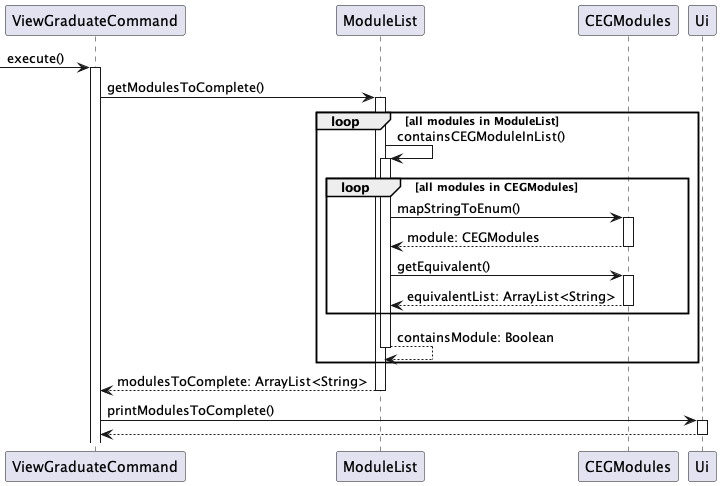
View Courses Needed to Graduate
This feature is implemented under the
ViewGraduateCommandinstead of the previousViewCommandas it is invoked under a different keyword (i.e.graduate).
- User input is passed into
Parser.getCommand(), it returns an instance ofViewGraduateCommandandFAP.javawill call itsexecute()method. - It gets the modules left to complete by
ModuleList.getModulesToComplete()which loops over all the modules in the user’sModuleListand checks it againstCEGModulesto see if it is a valid CEG Module, or if its equivalent exists (e.g. CP3880 and EG3611A). - If the exact module is found in
CEGModules, the module and its equivalent will not be added to themodulesToComplete. printModulesToComplete()is called and prints out the required modules based on themodulesToComplete.
The following diagram illustrates how ViewGraduateCommand operates when its execute() method is called:
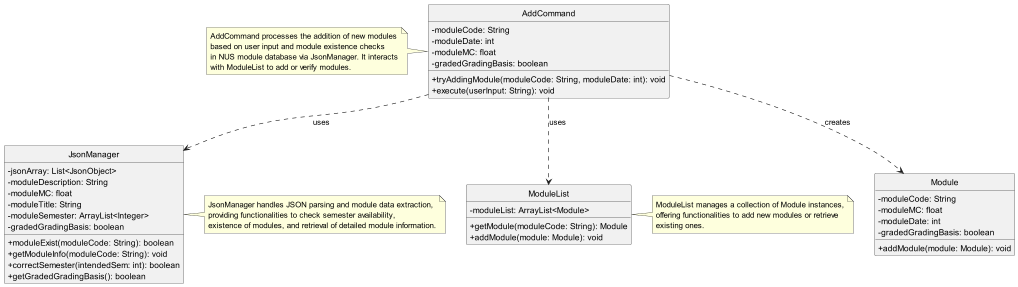
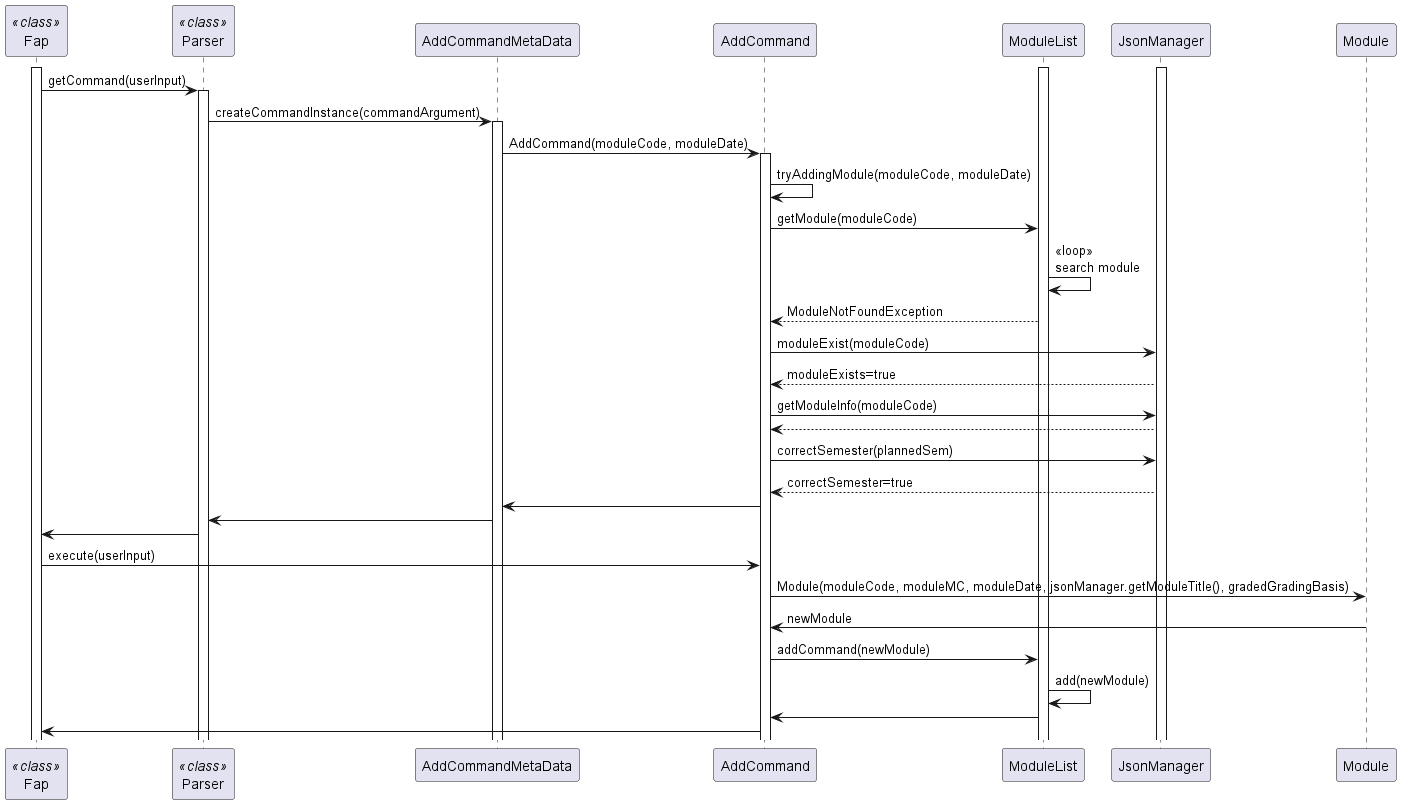
Adding a Module
Classes Involved:
Module: Manages the important attributes of an academic module.ModuleList: Manages a collection of academic modules.JsonManager: Handles operations related to reading from and writing to JSON files.AddCommand: Check for the state of module (whether it exist in NUS and already exist in ModuleList) and handle them appropriately
Module Class:
- Purpose
- Represents an academic module, holding information such as the module code, credits (MCs), grade, and description.
- Key Methods
setModuleGrade(String moduleGrade)
Sets the grade for the module. Validates the grade format and throwsModuleExceptionif the module hasn’t been taken yet.getGradeNumber()
Returns a numerical value associated with the module’s grade, used for GPA calculation.
ModuleList Class:
- Purpose
- Manages a collection of
Moduleobjects. It facilitates operations such as adding, removing, retrieving modules, calculating GPA, and grouping modules by semester.
- Manages a collection of
- Key Methods
addModule(Module module)
Adds a new module to the list. ThrowsIllegalArgumentExceptionif the module isnull.getModule(String courseCode)
Retrieves a module by its course code. ThrowsModuleNotFoundExceptionif the module is not found.removeModule(Module module)
Removes a specified module from the list.changeModuleGrade(String moduleCode, String grade)
Changes the grade of a module identified by its course code.tallyGPA()
Calculates and returns the GPA based on the modules in the list. ThrowsGpaNullExceptionif there are no modules with countable gradesgroupModulesBySemester()
Groups modules by their semester and returns a map where each key is a semester, and each value is a list of modules in that semester.
Flow and Interactions:
- Main point of entry is
AddCommandclass where it will check the user commands passed by the Parser class. The check is to see if the module exist in NUS and in the moduleList. - If the module exist in NUS and is not a duplicate (does not exist in moduleList), then the
addModulemethod in ModuleList is called which will instantiate aModuleobject - If the module does not exist in NUS or is a duplicate, an exception is throw which are shown are below,
Error Handling
ModuleAlreadyExistException: Thrown if there are duplicate modules in ModuleListModuleNotFoundException: Thrown if module does not exist in the NUS list of modulesWrongSemesterException: Thrown if the user attempts to add a module in a semester which it is not available to be taken in
Getting module details from Json File (JsonManager Class):
Overview
The JsonManager class is designed to manage and interact with module information stored in a JSON format. It
provides functionalities for checking the existence of modules, retrieving module information such as Modular
Credits (MCs), description, and title from a JSON file.
Constructor:
JsonManager(): Initializes a new instance of theJsonManagerby loading the module information from a JSON file located at/moduleInfo.json.
Methods:
-
Module Existence
moduleExist(String moduleCode): Checks if a module with the specified code exists in the JSON data.- Parameters:
String moduleCode- The code of the module to check for existence. - Returns:
boolean-trueif the module exists,falseotherwise.
- Parameters:
-
Module Information Retrieval
getModuleInfo(String moduleCode): Retrieves detailed information about a module, including its Modular Credits, description, and title, based on the module code.- Parameters:
String moduleCode- The code of the module for which information is to be retrieved. - Note: This method updates the internal state of the
JsonManagerobject with the retrieved module information.
- Parameters:
-
Information Accessors
getModuleDescription(): Returns the description of the last module queried.- Returns:
String- The description of the module.
- Returns:
getModuleMC(): Returns the Modular Credits of the last module queried.- Returns:
int- The Modular Credits of the module.
- Returns:
getModuleTitle(): Returns the title of the last module queried.- Returns:
String- The title of the module.
- Returns:
Error Handling
- The constructor throws a
RuntimeExceptionif the JSON file containing module information cannot be found or accessed, ensuring that the application is aware of missing or inaccessible module data.
Usage
JsonManager jsonManager = new JsonManager();
if (jsonManager.moduleExist("CS1010")) {
   jsonManager.getModuleInfo("CS1010");
   System.out.println("Module Title: " + jsonManager.getModuleTitle());
   System.out.println("Module Description: " + jsonManager.getModuleDescription());
   System.out.println("Module MC: " + jsonManager.getModuleMC());
}
Below is a sequence diagram that shows the flow of the implementation when a module is added by the user.
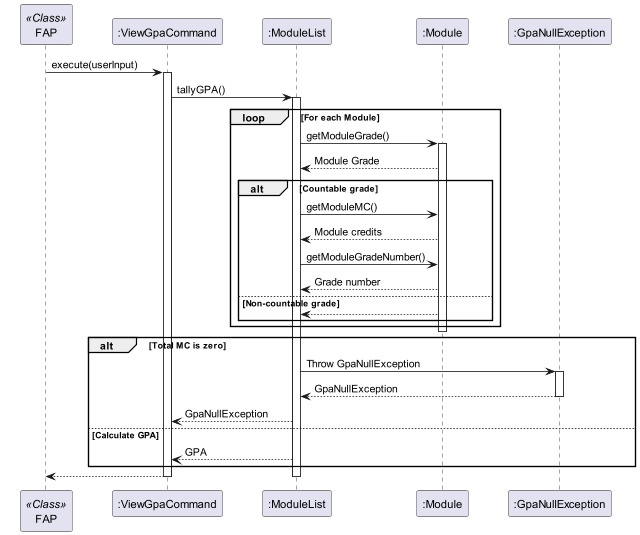
Viewing GPA
The ViewGpaCommand class is responsible for displaying the current GPA attained by the student. It
accesses ModuleList, which looks through all Module object contained in the list. If the Module is marked as
taken and has been assigned a valid grade with GradeCommand by the user, its grades will be included into the
calculation.
This is the formula used for tabulation of GPA.
GPA = SUM(Course Grade Point * Course Units) / SUM(Course Units Counted Towards GPA)
Below is the sequence diagram for ViewGpaCommand.
 —
—
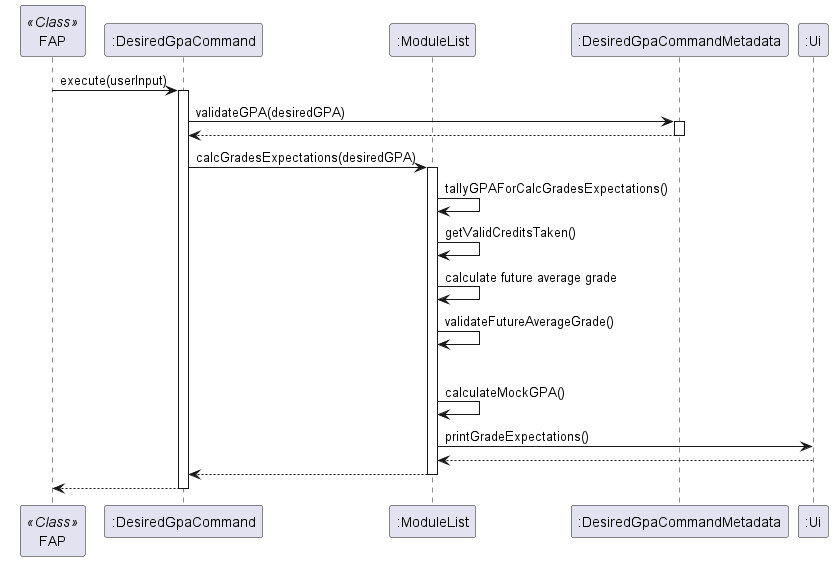
Desired Gpa
The DesiredGpaCommand class executes the program to calculate if desired GPA is feasible.
Checking for feasibility depends on several conditions:
- The current GPA
- The number of MCs taken (excluding mods that are S or CS)
- The number of MCs user plan to take by graduation
- The number of MCs left to take
- The desired GPA
Firstly, the current GPA will be obtained via tallyGPA() in moduleList. This will also tabulate the current number MCs taken based on the number of modules that have been assigned a grade in the planner. One thing to look out for will be modules that have been assigned S or CS, as those modules will not be accounted for in GPA calculation, but will affect the number of MCs that the user have yet to take.
Next, the program will tabulate the GPA needed for the remaining MCs in order to achieve desired GPA when combined with current GPA. This is based on the formula
Desired GPA = (Current GPA * MCs taken) + (GPA to attain * MCs not taken) / (total MCs)
NOTE:
- Total MCs is the total number of MCs that get contributes to GPA by graduation, thus not accounting for modules that are CS/CU.
- In this version, we assume user will only take a maximum of 160MCs. In future implementations, the user can change that option, which will affect the GPA to attain.
- In this version, if user has already inputted more than 160MCs worth of modules, the code will throw an exception and stop.
If (GPA to attain) calculated is more than 5 or less than 0, it means that it is not feasible to reach the desired GPA.
If (GPA to attain) is feasible, we will try to find the easiest way to achieve desired GPA. As there are many different combinations, we will just work with two grades closest to (gpa to attain), the one directly above (named upperBound) and directly below (named lowerBound).
For example, if (GPA to attain) is 4.25, then upperBound will be “A-“ (grade = 4.5), and lowerBound will be “B+” (grade = 4.0).
Note:
- Assume the remaining modules to be taken are all 4 MCs
Initialise a variable, mockGPA, to keep track of the future GPA. mockGPA is initialised to lowerBound grade value.
Using a while loop:
- Checks if mockGPA is above (GPA to attain)
- If yes, we will need one more upperBound grade
- Else, the user can just take one more lowerBound grade
- Update mockGPA
- Stop the loop once total MCs is reached
After the final iteration, mockGPA could be below (GPA to attain) as adding one more lowerBound grade can push mockGPA to be lower than (GPA to attain). To fix this, we just need to increment number of upperBound by 1 and decrement number of lowerBound by 1.
With this, we can find the least number of upperBound grade the user need to attain to achieve their desired GPA.
Below is the sequence diagram of the entire function:
Appendix: Requirements
Product scope
Target user profile
Computer Engineering (CEG) Student at NUS
- has a lot of modules to manage
- need to calculate the gpa fast without having to go to the school website
- is reasonably comfortable using CLI apps
- can type fast
- wants to predict what grades to get to secure a certain GPA
Value proposition
- User can plan the modules they want to take in the future
- User can add the modules they have taken so far to keep track of them
- User can calculate their current GPA
- User can calculate what are the grades they need to get based on the input desired GPA
- User can view their academic plan across all his/her semesters
- User can save their academic plan upon quitting the program and view them later
User Stories
| Version | As a … | I can … | So that I can … |
|---|---|---|---|
| v1.0 | Student User | Add modules | Add in modules that I have taken or plan to take |
| v1.0 | Student User | Remove modules | Remove wrong inputs |
| v1.0 | Student User | View modules that I have inputted | Track the modules I have added |
| v1.0 | Student User | Insert module grade | Track my grades |
| v1.0 | Recurrent Student User | View my GPA | Keep track of my overall performance |
| v1.0 | New Student User | Add my name | Personalise my app |
| v2.0 | Recurrent Student User | Input my current semester | Use features related to my current semester |
| v2.0 | Recurrent Student User | Store my data | Load my progress from my previous usage |
| v2.0 | Student User | View modules needed to graduate | See which modules I still need to plan for |
| v2.0 | Recurrent Student User | Check feasibility of desired GPA | Work towards my ideal GPA |
| v2.0 | New Student User | View commands for CLI | Navigate the app |
| v2.1 | Student User | View module details | Find out more about a module |
Use Cases
Use case: Adding of Module
- User request to add a module and input the name of the module and the semester to be taken in
- JsonManager checks the existence of the module in NUS and retrieves the necessary information
- Prints out the module that is added and its description
-
Module is added into moduleList and save in the corresponding savefile
Use case ends
Extensions
- 2a. JsonManager could not find the module in the Jsonfile (does not exist in NUS)
- 2a1. ModuleNotFoundException is thrown
- 2b. ModuleList finds a duplicate module
- 2b1. ModuleAlreadyExistException is thrown
Use case ends
Use case: Deleting of a Module
- User requests to delete a module and inputs the name of the module
- ModuleList finds the module in its list
- Module is deleted
-
savefile is updated
Use case ends
Extensions
+ 2a. ModuleList could not find the module in its list + ModuleNotFoundException is thrownUse case ends
Non-Functional Requirements
- Should work on any mainstream OS as long as it has Java 11 or above installed.
- A user with above average typing speed for regular English text (i.e. not code, not system admin commands) should be able to accomplish most of the tasks faster using commands than using the mouse.
- User must be a major of computer engineering
- User must be aware of what the prerequisites of the modules they are adding as the program do not check it for you
- If the user failed a mod, the user is not allowed to retake the module and add it into the program
Glossary
- JsonManager: The class that manages the json file
- mainstream OS: Windows, macOS, Linux
- regular expressions (regex): sequence of characters that defines a search pattern, used mainly for pattern matching within strings
Instructions for manual testing
Important note: The provided test cases are independent of each other, test cases that require multiple entries of command will be explicitly stated. All provided test cases are assumed to be executed fresh after launch.
Launching and Termination
Launching
-
Ensure you have
java 11or above installed on your computer -
Download the latest
FAP.jarfrom here -
Copy the file
FAP.jarto a new empty folder - Open a command terminal in the directory of the folder, and use
java -jar FAP.jarto run the application -
The list of available commands should show upon a successful launch as show below:
~\FAPTesting>java -jar FAP.jar _____________________________________________________________ Hello! This is your CEG Future Academic Planner! What would you like to do today? _____________________________________________________________ Available Commands: NOTE: "<WORD>" represents a user-typed argument that is required for the command 1. set n/<NAME> curr/<CURR_SEM> - Set name & current semester 2. add c/<COURSE_CODE> w/<WHEN> - Add a module to your schedule 3. remove c/<COURSE_CODE> - Remove a module from your schedule 4. grade c/<COURSE_CODE> g/<GRADE> - Add or change a module grade 5. gpa - View your GPA 6. desiredgpa <GPA> - Calculates grades needed to achieve a desired GPA 7. view - View modules on your schedule 8. view c/<COURSE_CODE> - View selected module information 9. graduate - View remaining core modules and MCs left to graduate 10. help - View command syntax and list of commands available for FAP 11. bye - Exit the program Argument format: <NAME>: Alphabetic characters and optionally spaces between <CURR_SEM>: Valid semester from 1-8 <COURSE_CODE>: Valid NUS course code from AY23-24 <WHEN>: Valid semester from 1-8 <GRADE>: Alphabetic grade (A+, A, A-, B+, B, B-, C+, C, D+, D, F, CS, S) <GPA>: Number from 0 to 5 _____________________________________________________________ - A new folder
datain the same directory asFAP.jarshould be created and initialized withCS2113_AY2324S2_FAP_Storage.txt.
Termination
- Exit FAP using the
byecommand. -
An exit message should be displayed as follows:
 bye
 _____________________________________________________________
 Bye. Enjoy your studies!
Back to Manual Testing
Add
Adding a module:
-
Test Case:
add c/CS2113 w/4Expected result: Module added, success message printed.
-
Test Case: (The following test case requires multiple lines of inputs)
 add c/CS2113 w/4
 add c/CS2113 w/4
Expected Result: Module not added, error message printed saying duplicate module.
-
Test Case:
add c/AB1234 w/1Expected result: Module not added, error message printed saying modules does not exist in NUS.
Back to Manual Testing
Remove
-
Test Case: (The following test case requires multiple lines of inputs)
 add c/ST2334 w/4
 remove c/ST2334
Expected Result: Module removed, successful remove message printed.
-
Test Case:
remove c/ST2334Expected Result: Module not removed (was not added in the first place), module not found message printed.
Back to Manual Testing
View
Taken Modules
-
Test Case:
viewExpected Result: Prints out an empty table of modules, along with Anonymous as the user’s name, and several other default statistics as shown:
_____________________________________________________________ CEG Study Plan for: Anonymous _____________________________________________________________ | Y1S1 [Sem 1] | Y1S2 [Sem 2] | Y2S1 [Sem 3] | Y2S2 [Sem 4] | _____________________________________________________________ | Y3S1 [Sem 5] | Y3S2 [Sem 6] | Y4S1 [Sem 7] | Y4S2 [Sem 8] | _____________________________________________________________ - Current Study: Semester 1 - Total MCs taken: 0.00 / 160 - Total MCs listed: 0.00 / 160 _____________________________________________________________ -
Test Case: (The following test case requires multiple lines of inputs)
 add c/CS2113 w/4
 add c/CS1010 w/1
 add c/ST2334 w/6
 set n/JohnDoe curr/6
 view
Expected Results: Table filled with modules based on what was previously added, categorized based on when it was taken, along with updated user data and other statistics as shown below:
 _____________________________________________________________
 CEG Study Plan for: JohnDoe
 _____________________________________________________________
 | Y1S1 [Sem 1] | Y1S2 [Sem 2] | Y2S1 [Sem 3] | Y2S2 [Sem 4] |
 |CS1010        |              |              |CS2113        |
 _____________________________________________________________
 | Y3S1 [Sem 5] | Y3S2 [Sem 6] | Y4S1 [Sem 7] | Y4S2 [Sem 8] |
 |              |ST2334        |              |              |
 _____________________________________________________________
 - Current Study: Semester 6
 - Total MCs taken: 12.00 / 160
 - Total MCs listed: 12.00 / 160
 _____________________________________________________________
Module Information
-
Test Case:
view c/CS2113TExpected Results: Prints out module information as shown below:
================================================================================= | Title: Software Engineering & Object-Oriented Programming Credits: 4 | ================================================================================= | Description: This course introduces the necessary skills for systematic and | | rigorous development of software systems. It covers requirements, design, | | implementation, quality assurance, and project management aspects of | | small-to-medium size multi-person software projects. The course uses the | | Object Oriented Programming paradigm. Students of this course will receive | | hands-on practice of tools commonly used in the industry, such as test | | automation tools, build automation tools, and code revisioning tools will be | | covered. | ================================================================================= -
Test Case:
view c/AB1234Expected Results: Prints out message saying module does not exist in NUS AY23/24:
 _____________________________________________________________
 No such module found in NUS AY23-24!
 _____________________________________________________________
Modules to Graduate
-
Test Case:
graduateExpected Results: Prints out all CEG Modules to be completed by default.
-
Test Case: (The following test case requires multiple lines of inputs)
 add c/CP3880
 graduate
Expected Results: Prints out all CEG Modules to be completed, except for
CP3880and its equivalentEG3611A. -
Test Case: (The following test case requires multiple lines of inputs)
 add c/GEC1015
 graduate
Expected Results: Same as first test case as
GEC1015is a valid NUS module, but is not a necessary module for a CEG student. -
Test Case: (The following test case requires multiple lines of inputs)
 add c/GEA1000
 graduate
Expected Results: Prints out all CEG Modules to be completed, except for
GEA1000.
Back to Manual Testing
Set Grade
-
Test Case: (The following test case requires multiple lines of inputs)
 add c/GEA1000
 grade c/GEA1000 g/A+
Expected Results: Updates grade, prints out grade successfully updated message.
-
Test Case:
grade c/GEA1000 g/A+Expected Results: Grade not updated, prints out module note found in list message.
-
Test Case: (The following test case requires multiple lines of inputs)
 add c/GEA1000
 grade c/GEA1000 g/L
Expected Results: Grade not updated, prints out invalid grade format/order message.
Back to Manual Testing
GPA
-
Test Case:
gpaExpected Results: Prints out message stating no grades available to calculate.
-
Test Case: (The following test case requires multiple lines of inputs)
 add c/GEA1000
 add c/GEC1015
 grade c/GEA1000 g/A+
 grade c/GEC1015 g/A-
 gpa
Expected Results: Prints out calculated GPA.
Back to Manual Testing
Check Desired GPA
-
Test Case:
desiredgpa 4.75Expected Results: Prints out student require 20 A and 20 A- to attain 4.75 GPA.
-
Test Case: (The following test case requires multiple lines of inputs)
 add c/GEA1000 w/1
 add c/GEC1015 w/1
 add c/CFG1002 w/1
 grade c/CFG1002 g/CS
 grade c/GEA1000 g/B+
 grade c/GEC1015 g/A-
 desiredgpa 4.6
Expected Results: Prints message that MCs left to take is 150, user will need 2 A and 36 A- and end GPA is 4.51.
Back to Manual Testing
Test Storage
- Use
java -jar FAP.jarto run the application -
Test Case: (The following test case requires multiple lines of inputs)
 add c/CS2113 w/4
 add c/CS1010 w/1
 add c/ST2334 w/6
 set n/JohnDoe curr/6
 bye
Expected Results: Application should terminate successfully, and the data should be saved to the file.
- Use
java -jar FAP.jarto run the application -
Test Case:
viewExpected Results: Table filled with modules based on what was previously added, categorized based on when it was taken, along with updated user data and other statistics as shown below:
 _____________________________________________________________
 CEG Study Plan for: JohnDoe
 _____________________________________________________________
 | Y1S1 [Sem 1] | Y1S2 [Sem 2] | Y2S1 [Sem 3] | Y2S2 [Sem 4] |
 |CS1010        |              |              |CS2113        |
 _____________________________________________________________
 | Y3S1 [Sem 5] | Y3S2 [Sem 6] | Y4S1 [Sem 7] | Y4S2 [Sem 8] |
 |              |ST2334        |              |              |
 _____________________________________________________________
 - Current Study: Semester 6
 - Total MCs taken: 12.00 / 160
 - Total MCs listed: 12.00 / 160
 _____________________________________________________________